TM 9-2350-238-34-1
2 - 4 9 . M A I N T E N A N C E O F B A T T E R Y A C C E S S C O V E R ( C O N T ) .
1
2
3
4
5
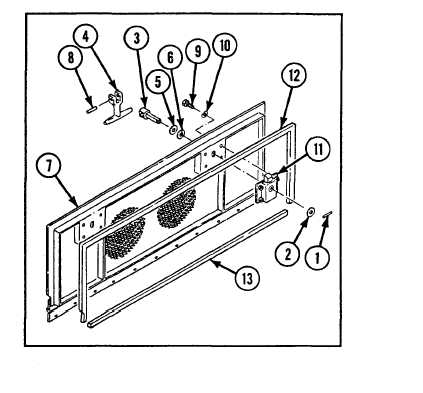
Remove two spring pins (1) and two flat
washers (2) from two headed straight pins
(3).
R e m o v e t w o m a n u a l c o n t r o l h a n d l e s ( 4 ) w i th
two headed straight pins (3), two flat wash-
ers (5), and two spring tension washers (6)
from door (7).
Remove two handle spring pins (8) and two
m a n u a l c o n t r o l h a n d l e s ( 4 ) f r o m t w o h e a d e d
straight pins (3).
R e m o v e e i g h t m a c h i n e s c r e w s ( 9 ) , e i g ht
lockwashers (10), and two rim latches (11)
from door (7).
If damaged, remove access door seal (12)
and rubber strip (13) from door (7).
1 I n s p e c t f o r b r o k e n , d a m a g e d , o r m i s s i n g p a r t s.
2 R e p a i r i s b y r e p l a c e m e n t o f a u t h o r i z e d p a r t s ( T M 9 - 2 3 5 0 - 2 3 8 - 2 4 P - 1 ).
1
2
3
4
If access door seal (12) and rubber strip (13) were removed, clean door (7) with cleaning
compound. Coat new access door seal (12) and new rubber strip (13) with adhesive, and install
on door (7).
Install two rim latches (11), eight new Iockwashers (10), and eight machine screws (9) on door (7) .
Install two manual control handles (4) on two headed straight pins (3), and secure with two new
handle spring pins (8).
Install two new spring tension washers (6), two flat washers (5), and two headed straight pins (3)
with two manual control handIes (4) in door (7). Secure with two flat washers (2) and two new
spring pins (1).
2 - 1 52


