CHAPTER 9: MAINTENANCE OF HULL- AND CAB-RELATED COMPONENTS
TM 9-2350-256-20
9-69 REPLACE/SERVICE DRAIN VALVE CONTROLS - Continued
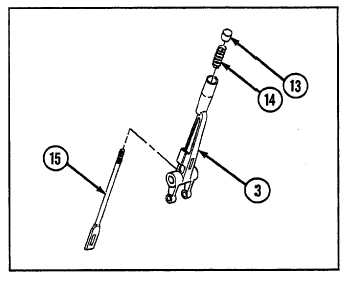
4
Remove control lever push button (13), spring (14),
and lever rod-and-pawl assembly (15) from control
lever assembly (3).
5
Remove control lever support assembly (10) from
vehicle by removing two screws (16), two flat washers
(17), and two lockwashers (18).
6
Remove retaining strap (19) by removing screw (20)
and lockwasher (21).
7
Disconnect front drain valve cable assembly (1) from
front drain valve bracket assembly (22) by removing
cotter pin (23) and straight pin (24).
8
Remove drain control lever (25) from front drain valve
bracket assembly (22) by removing two cotter pins (26)
and straight pin (27).
9
Remove front drain valve bracket assembly (22) from vehicle hull by removing three screws (28) and three
lockwashers (29).
10 Remove front drain valve cable assembly (1) by removing five screws (30), five lockwashers (31), and five cable
clamps (32). Pull front drain valve cable assembly through grommets (33 and 34).
11 Remove two yokes (35) and two jamnuts (36) from front drain valve cable assembly (1).
12 Remove rear drain valve cable assembly (2) from rear drain valve bracket assembly (37) by removing cotter pin (38)
and straight pin (39).
13 Remove drain control lever (40) from rear drain valve bracket assembly (37) by removing two cotter pins (41) and
straight pin (42).
14 Remove rear drain valve bracket assembly (37) from vehicle hull by removing three screws (43) and three
lockwashers (44).
15 Remove rear drain valve cable assembly (2) by removing four screws (45), four lockwashers (46), and four cable
clamps (47). Pull rear drain valve cable assembly through grommet (33).
16 Remove two yokes (48) and two jamnuts (49) from rear drain valve cable assembly (2).
9-138