SECTION II: ENGINE OIL COOLERS
TM 9-2350-256-20
5— 7 REPLACE/REPAIR ENGINE OIL COOLER LINES
THIS TASK COVERS
a. Removal
b. Cleaning
c. Inspection
d. Installation
INITIAL SET-UP
Tools:
Material/Parts-Continued:
Tool kit, general mechanic's (Appendix C, item 53)
• Nuts, self-locking (12) (Appendix G, item 166)
Material/Parts:
Equipment Conditions:
• Dry-cleaning, solvent (Appendix D, item 9)
• Engine deck removed (see paragraph 9-51)
• Gaskets (4) (Appendix G, item 52)
• Oil drained to crankcase (see paragraph 3-7)
NOTE
The following procedure applies to either the left- or right-hand oil cooler lines.
a.
REMOVAL
1
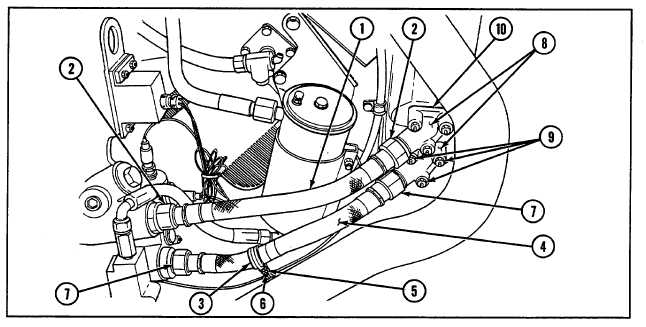
Remove engine oil cooler inlet line (1) by loosening union nut (2) at each end.
2
Remove loop clamp (3) from engine oil cooler outlet line (4) by removing nut (5) and screw (6).
3
Remove engine oil cooler outlet line (4) by loosening union nut (7) at each end.
4
Remove two elbows (8) by removing three self-locking nuts (9) and gasket (10) from each.
b.
CLEANING
WARNING
Dry-cleaning solvent used to clean parts is potentially dangerous to personnel and property. Do not use near open
flame or excessive heat. Flashpoint of solvent is 138 degrees (°) Fahrenheit (F) (590 Celsius [C] ).
Clean two engine oil cooler lines (1 and 4) and two elbows (8) thoroughly with dry-cleaning solvent.
5—
13


