SECTION I: FUEL SYSTEM
TM 9-2350-256-20
3
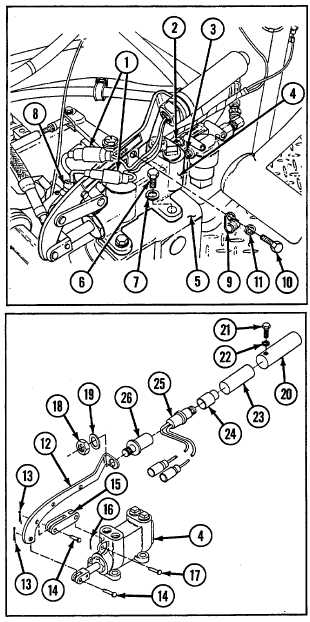
Remove purge pump assembly (4) from mounting
bracket (5) by removing four screws (6), four
lockwashers (7), and clamp (8).
4
Remove clamp (9) by removing screw (10) and
lockwasher (11).
b. DISASSEMBLY
1
Remove lever (12) from purge pump assembly (4) by
removing two cotter pins (13) and two straight pins
(14).
2
Remove lever bracket (15) by removing cotter pin (16)
and straight pin (17).
3
Remove nut (18), lockwasher (19), and handle
assembly (20).
4
Remove screw (21) and lockwasher (22) from handle
assembly (20).
5
Remove bushing (23) and push button (24) from
handle assembly (20).
6
Remove switch (25) from connector (26).
c. ASSEMBLY
1
Slide switch (25) into connector (26).
2
Install push button (24) and new bushing (23) into
handle assembly (20).
3
Install handle assembly (20) onto connector (26) with
new lockwasher (22) and screw (21).
4
Install handle assembly (20) with new lockwasher (19)
and nut (18).
5
Install lever (12) to purge pump assembly (4) with two
straight pins (14) and two new cotter pins (13).
6
Install lever bracket (15) with straight pin (17) and new
cotter pin (16).
d. INSTALLATION
1
Install purge pump assembly (4) to mounting bracket (5) with clamp (8), four new lockwashers (7), and four screws
(6).
2
Install clamp (9) with screw (10) and new lockwasher (11).
3
Connect fuel line at coupling (2) and fuel line at nipple (3) to purge pump assembly (4).
4
Connect two electrical connectors (1).
4—
21