TM 9--2350--292--10
0100 00--2
WINCH ELECTRICAL SYSTEM TROUBLESHOOTING -- CONTINUED
0100 00
LEVEL WINDER MALFUNCTION INDICATOR COMES ON -- CONTINUED
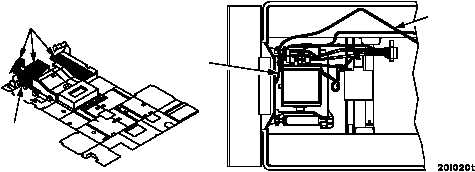
Step 3. Remove floor plates. Check for hydraulic leaks at level winder. Check that quick--disconnect on hose
33 and 34 (hydraulics for level winder) is properly connected.
Connect quick--disconnect, tighten connections, or notify unit maintenance if there are any damaged
hoses.
HOSE 33
HOSE 34
FLOOR
PLATE
FLOOR
PLATES
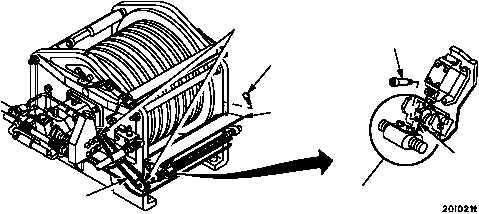
Check for cable problems including birdnesting, skipped wraps, kinks, broken strands, excess mud/debris
build--up, misalignment between cable on drum and trumpet. Check for damage to level wind drive chain
and sprockets. Remove two thumbscrews and raise diamond screw cover. Check for damage to level
wind components, check for damaged/missing shoulder bolt or plate at the diamond screw/level wind in-
terface.
DIAMOND SCREW
COVER
SHOULDER
BOLT
PLATE
LEVEL WIND
DRIVE CHAIN
DIAMOND SCREW/LEVEL WIND
INTERFACE
LEVEL WIND
DRIVE SPROCKETS
THUMB
SCREW
If there is damage to winch, level winder, cable, drive chain, or sprockets, or if shoulder bolt or plate is
missing or damaged, do not operate winch. Notify unit maintenance.
Step 4. Use WINCH OVERRIDE switch and main winch operating lever to intermittently pay out and inhaul
winch cable to make sure main winch cable is wrapping and unwrapping properly during inhaul and
payout. Maintaining cable tension, use WINCH OVERRIDE switch and carefully payout main winch
cable just past the point where spooling malfunction occurred. Correct spooling malfunction.
Step 5. If problem still exists, notify unit maintenance.
PAYOUT LIMIT INDICATOR COMES ON
Step 1. Check main winch to see if four wraps of cable are left on winch drum.
Move WINCH OVERRIDE switch to ON and INHAUL main winch cable until indicator goes out (one to one
and a half wraps), then release WINCH OVERRIDE switch to OFF position.
Step 2. If problem still exists, notify unit maintenance (MAIN WINCH INHAULS BUT WILL NOT PAYOUT).


