TM 9--2350--292--20--1
0196 00--2
ENGINE OIL FITLERS REPLACEMENT -- CONTINUED
0196 00
Removal--Continued
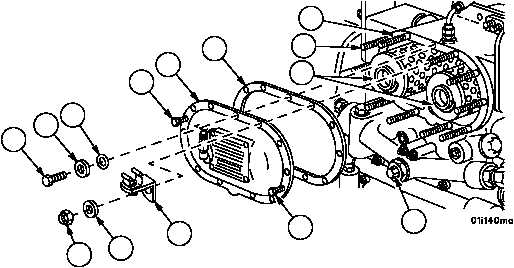
5. Remove oil filter cover (9) using two jackscrews (8) for support. Remove jackscrews (8).
6. Remove gasket (10). Discard gasket.
7. Remove two oil filter elements (11) from oil filter housing (12). Discard oil filter elements.
8. Inspect parts for damage and replace as required.
Installation
1. Clean oil filter housing (12) with cleaning cloth.
2. Install two new oil filter elements (11) into oil filter housing (12).
3. Install new gasket (10) under oil filter cover (9).
4. Apply lubricant to threads of 10 studs (13).
5. Secure cover (9) with 10 flat washers (6), 10 new self--locking nuts (5) and retaining clip mounting bracket (7).
Torque self--locking nuts (5) to 125--150 lb--in (14.13--16.95 NSm).
CAUTION
Do not tighten drain valve plug above specified torque
value. Failure to tighten drain valve plug until plug bot-
toms will result in loss of engine oil pressure. Failure to
comply could result in damage to engine.
6. Apply lubricant to threads of drain valve plug (4), torque drain valve plug (4) to 150 lb--in (16.95 NSm).
7. Apply lubricant to threads of oil vent screw (1) and install oil vent screw (1) with flat washer (2) and new preformed
packing (3). Torque oil vent screw (1) to 125--150 lb--in (14.13--16.95 NSm).
8. Fill engine with oil in accordance with WP 0187 00.
Figure 5
4
1
2
3
6
5
7
8
8
9
10
11
13
12
NOTE
FOLLOW--ON MAINTENANCE:
Install engine deck grilles (TM 9--2350--292--10)
END OF TASK