TM 9--2350--292--20--2
0648 00--2
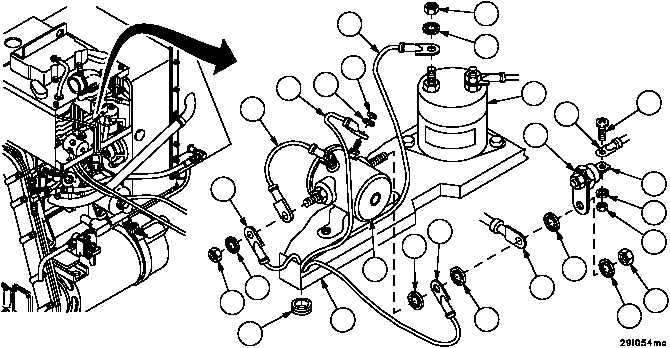
AUXILIARY POWER UNIT WIRING HARNESS 3W711 REPLACEMENT --
CONTINUED
0648 00
Removal--Continued
NOTE
Tag all electrical connections and electrical leads prior to
removal to aid in installation.
Where applicable, remove adhesive to expose desig-
nated electrical terminals.
2. Remove nut (3), lockwasher (4) and wiring harness 3W711 wire 421 (5) from terminal of fuel shutoff solenoid (6).
Discard lockwasher.
3. Remove screw (7), lockwasher (8), nut (9) and wiring harness 3W711 wire S (10) at cathode (terminal end) of
diode (11). Discard lockwasher.
4. Remove nut (12), four lockwashers (13), wire R (14), wiring harness 3W711 wire 65 (15) and plate (link) (16) at
terminal of preheat relay (17). Discard lockwashers.
5. Remove nut (18), lockwasher (19) and wiring harness 3W711 wire 487 (20) at terminal of preheat relay (17).
6. Remove nut (21), lockwasher (22), lead assembly 11671380--1 wire P (23) and wiring harness 3W711 wire N (24)
from terminal of preheat relay (17).
7. Thread wiring harness 3W711 wires 421 (5), S (10), 65 (15), 487 (20) and N (24) through grommet (25). Remove
grommet (25) from cylinder shroud panel (26).
Figure 344
23
20
19
18
5
3
4
6
7
10
16
11
8
9
12
13
13
14
13
15
13
17
26
25
24
22
21