TM 5-4240-501-148P
CARBURETION
Pulsa-Jet, Vacu-Jet
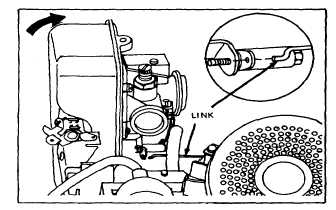
Fig. 20 - Removing Fuel Tank Assembly
Removing Carburetor, Model Series 82000 and 92000
Choke-A-Matic
Remove screws holding carburetor on tank body. Then
lift carburetor straight up. Remove pump spring, spring
cup and diaphragm.
Removing Carburetor,
Model Series 92000, 94000,
110900 and 111900,
Automatic Choke
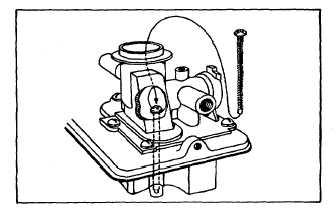
Remove screws holding carburetor on tank body. On
Model Series 110900 and 111900 a mounting screw is
located under the choke valve. To gain access to the
screw, open the choke valve completely. Use a #2
Phillips head screwdriver to remove the screw, Fig. 21.
Then lift carburetor straight up. Remove pump spring,
spring cup and diaphragm.
Fig. 21 - Screw Under Choke Valve
Carburetor Repair Pulsa-Jet, Vacu-Jet
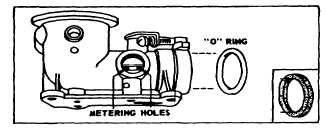
Zinc Carburetor Body
Remove and discard "0" ring. Remove and inspect
needle valve, packing and seat. Metering holes in
carburetor body should be cleaned with solvent and
compressed air. Do not alter size of holes. See Fig. 22.
Always remove all nylon and rubber parts if carburetor is
soaked in solvent.
Fig. 22 - Metering Holes an "O" Ring
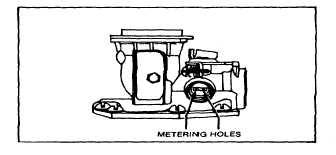
Minion Carburetor Body
Remove and discard "O" ring. Remove needle and seat
assembly by backing out mixture adjusting needle about
4 to 5 turns counterclockwise. Then pull needle and seat
assembly out. Remove inner "0" ring. Metering holes in
carburetor body should be cleaned with solvent and
compressed air. CAUTION
: Commercial carburetor cleaners will soften or dissolve
Minion bodies, if left in for long periods of time. DO NOT
EXCEED 15 MINUTES. DO NOT ALTER SIZE OF
METERING HOLES, Fig. 23.
Fig. 23 - Metering Holes
Always remove all nylon and rubber parts if carburetor is
cleaned in solvent.
9