TM 5-4240-501-148P
CARBURETION
PULSA-JET
PULSA-JET CARBURETORS
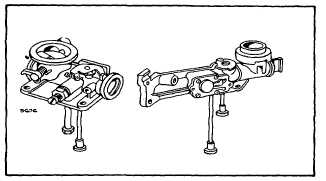
Fig. 41 - Pulsa-Jet Carburetor
Carburetor and Tank Assembly
Remove the carburetor and fuel tank as one unit, being
careful not to bend the governor linkage. On models
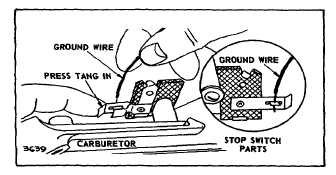
equipped with a stop switch, remove the ground wire.
Fig. 42.
Fig. 42 - Removing Ground Wire
After removal of the carburetor from the fuel tank,
inspect the tank for deposits of dirt and/or varnish.
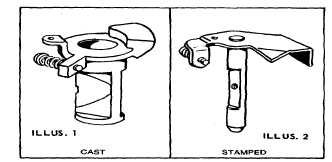
Throttle
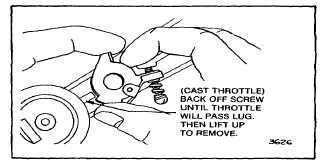
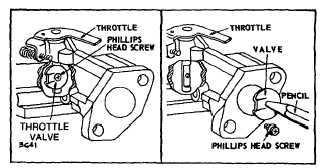
Cast throttles, Fig. 43, Illustration 1, are removed by
backing off the idle speed adjustment screw until the
throttle clears the retaining lug on the carburetor body,
Fig. 44.
Stamped throttles, Fig. 43, Illustration 2, are removed by
using a Phillips screw driver to remove the throttle valve
and screw. After removal of the valve, the throttle may
be lifted out, Fig. 45. Reverse procedure to install. Fig.
44.
Fig. 43 - Throttle Types
Fig. 44 - Removing Cast Throttle
Fig. 45 - Removing Stamped Throttle
Some carburetor models have a spiral in the carburetor
bore. To remove, fasten carburetor in a vise with
smooth jaws about half an inch below top of jaws. Grasp
spiral firmly with a pair of pliers, as shown, Fig. 46.
Place a screw driver under ledge of pliers. Using edge
of vise, push down on screw driver handle to pry out
spiral, Fig. 46. Inspect gasket surface of carburetor.
Repair if mounting surface is damaged.
When inserting spiral, top must be flush to 1/32" (.8 mm)
below carburetor flange, and spiral parallel with fuel tank
mounting surface, Fig. 46.
14