TM 5-4240-501-14&P
CARBURETION
Cross-Over Flo-Jet
Inspection
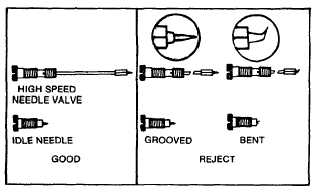
Check idle and high speed needle valves for burrs,
grooves or bent needle tips. Reject if damaged, Fig.
101. Check float for fuel in float, damage or leaks. If it
contains fuel or is crushed it must be replaced. If
carburetor leaks with new inlet needle valve, replace inlet
needle seat. See next paragraph.
Fig. 101
Replacing Pressed-In Float Valve Seat
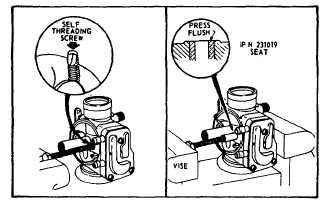
Use a #93029 self-threading screw or remove one self-
threading screw from a #19069 flywheel puller and clamp
head of screw in a vise. Turn carburetor body to thread
screw into seat. Fig. 102. Continue turning carburetor
body drawing seat out. Leave seat fastened to screw.
Insert new seat #231019 into carburetor body. (Seat has
starting lead.)
Fig. 102 - Replacing Float Valve Seat
Press new seat flush with body using screw and old seat
as a driver. See Fig. 102. Use care to insure seat is not
pressed below body surface or improper float to float
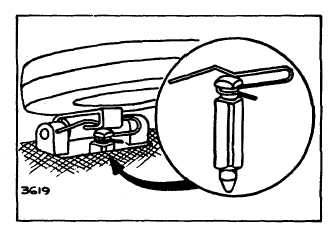
needle valve contact will occur. Install float valve as
shown in Fig. 103.
Fig. 103 - Float Needle Valve
Checking Float Level
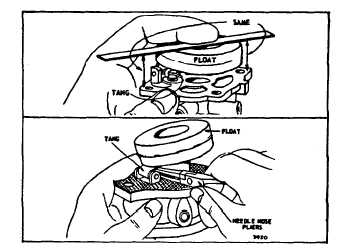
With float needle valve, float and float hinge pin installed,
hold carburetor upside down. The float should be
parallel to the bowl mounting surface. If not, bend tang
on float until they are parallel. DO NOT PRESS ON
FLOAT TO ADJUST, Fig. 104.
Fig. 104 - Checking Float Level
Repair Carburetor
Use new parts where necessary. Always use new
gaskets. Old gaskets take a set or harden and may leak.
Carburetor repair kits are available, see illustrated parts
list for part numbers. These carburetors use a viton tip
float needle and a pressed-in needle seat. The seat
does not need replacement unless the seat is damaged
or leaks with a new float needle.
28


