TM 5-4240-501-14&P
Starter motor armatures have very low resistance.
Usually below detection on available multimeters (volts-
amperes- ohms). To check for shorted armatures, a
piece of equipment known as a "growler" may be used.
If this equipment is not available, a known good armature
should be used and performance checked.
If the magnets are suspect, a new motor housing should
be tried to test motor performance.
ASSEMBLY OF STARTER MOTOR
When all parts have been thoroughly inspected, lightly
lubricate bearings with a #20 oil and reassemble in the
following manner.
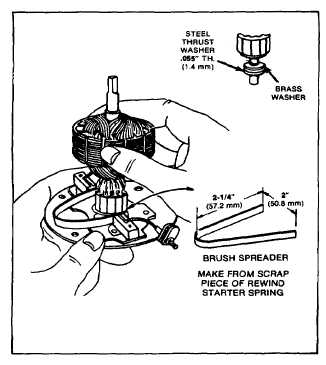
Insert brush springs and brushes in holders as far as
possible, and hold them in this position with tool shown in
Fig. 59. Place thrust washers on armature shaft, using
care to insure brushes clear commutator, slide armature
shaft into end cap bearing. See Fig. 59.
Fig. 59 - Assembling Armature to End Cap
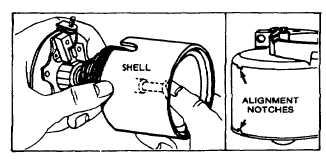
Support armature shaft and slide it slowly into starter
housing, as shown in Fig. 60. Insert rubber mounted
terminal into starter, housing at this time.
STARTERS
Nicad System
Fig. 60 -- Inserting Armature
Place remaining thrust washers on motor PTO shaft,
install end head cover and thru bolts. Notches in end
cap, housing and end head must be aligned. Fig. 60.
Check for end play to be sure armature is free. Slip
pinion and starter motor clutch gear on shaft, add a small
amount of gear lubricant to gears and install gear cover
and gasket. Fig. 61.
Fig. 61 - Lubricating Gears
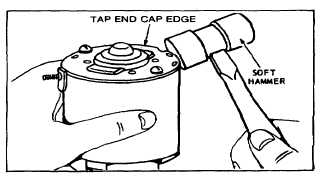
Tap end cap edge lightly using a soft hammer as this will
align the bearings. See Fig. 62.
Fig. 62 - Aligning End Cap Bearing
Replace nylon spur gear and retainer assembly. tighten
retainer screws securely. NOTE: Do not oil nylon spur
gear or clutch helix. Install starter cover. The starter
motor assembly is now ready
for re-installation to the engine.
15


