TM 9-2350-256-20
b.
DISASSEMBLY
NOTE
Clean and dry all parts, paying particular attention to electrical contacts.
1
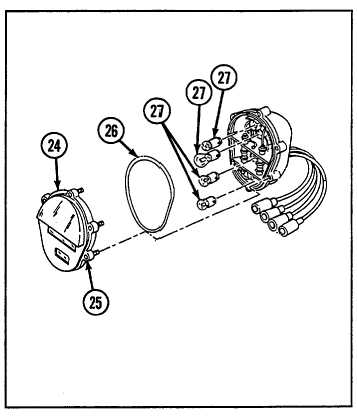
Remove door light assembly (24) by loosening six
(captive) screws (25).
2
Remove gasket (26).
3
Remove four lamps (27) by pressing in and turning
counterclockwise.
c.
ASSEMBLY
1
Install four lamps (27) by pressing in and turning
clockwise.
2
Install new gasket (26).
3
Install door light assembly (24) by tightening six
(captive) screws (25).
d.
INSTALLATION
1
Install two clips (17), two screws (21), two new
lockwashers (22), and two nuts (23).
2
Install electrical cable (15), screw (18), new
lockwasher (19), and nut (20).
3
Install two electrical cables (15 and 16) through clips (17).
4
Install grommet (11) over four electrical cables (4) and insert cables and grommet into hole in cover (3).
Connect electrical cables.
5
Install taillight (12), two grommets (10), two bushings (9), two flat washers (8), two ground leads (7), two new
lockwashers (6), and two screws (5).
6
Install two new lockwashers (14), two ground leads (7), and two nuts (13).
7
Install cover (3), two new lockwashers (2), and two screws (1).
H-2
REFLECTORS AND MOUNTING PLATES
THIS TASK COVERS
a. Removal
b. Installation
INITIAL SET-UP
Tools:
Parts:
Tool kit, general mechanic's (Appendix C, item 53)
• Lockwashers (4) (Appendix G, item 130)
• Lockwashers (4) (Appendix G, item 132)
H-3

