APPENDIX H: USAREUR SAFETY LIGHTING MODIFICATION KIT
TM 9-2350-256-20
H-6
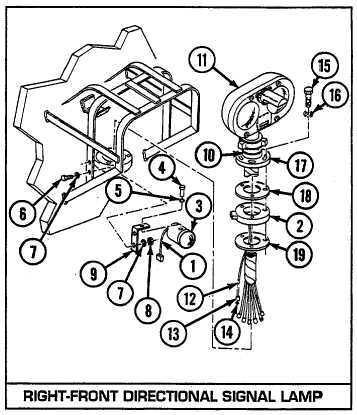
FRONT DIRECTIONAL S IGNAL LAMPS AND RELATED PARTS-Continued
a.
REMOVAL
1
Disconnect signal lamp wire assembly (1) from
adapter assembly (2) and signal lamp (3).
2
Remove screw (4), lockwasher (5), and signal
lamp
(3).
3
Remove two screws (6), four lockwashers (7), two
nuts (8), and bracket (9).
4
Loosen quick-disconnect coupling nut (10). Pull
front
headlight assembly (11) up and remove (pulling up
disconnects electrical connector).
5
Disconnect adapter assembly harness (12) in
screw compartment. Remove shell (13) and flat washer
(14)
if required.
6
Remove three screws (15), three lockwashers
(16),
cover (17), gasket (18), adapter assembly (2),
and
gasket (19).
b.
INSTALLATION
1
Install new gasket (19), adapter assembly (2),
new
gasket (18), cover (17), three new lockwashers
(16),
and three screws (15).
2
Install shell (13) and flat washer (14).
3
Connect adapter assembly harness (12) in crew compartment.
4
Place front headlight assembly (11) over mounting and push down to engage connector. Then, securely tighten
quick-disconnect coupling nut (10).
5
Install bracket (9), two screws (6), four new lockwashers (7), and two nuts (8).
6
Install signal lamp (3), screw (4), and new lockwasher (5).
7
Connect signal lamp wire assembly (1) to adapter assembly (2) and signal lamp (3).
H-8