TM 9--2350--292--20--1
0282 00--1
WINCH ILLUMINATION LAMP ASSEMBLY REPAIR
0282 00
THIS WORK PACKAGE COVERS:
Removal, Disasembly, Assembly, Installation
INITIAL SETUP:
Tools and Special Tools
General mechanic’s tool kit (item 1, WP 0717 00)
Materials/Parts
Lockwasher (item 339, WP 0718 00)
Finishing washer (item 340, WP 0718 00)
Retaining rings (2) (item 341, WP 0718 00)
Electrical contact (item 342, WP 0718 00)
Electrical connector (item 343, WP 0718 00)
Nonmetallic grommet (item 344, WP 0718 00)
Marker tags (item 49, WP 0716 00)
Equipment Conditions
Vehicle MASTER switch OFF (TM 9--2350--292--10)
Battery power disconnected (WP 0256 00)
References
TM 9--2350--292--10
NOTE
Perform Disassembly steps 1 through 5 and 7 and As-
sembly steps 2 through 6 for replacement of headlight
only.
Tag all electrical connections and electrical leads prior to
removal to aid in installation.
There are two winch lights, one each for the main winch
and the hoist winch. Both are removed, disassembled/
assembled and installed in the same manner.
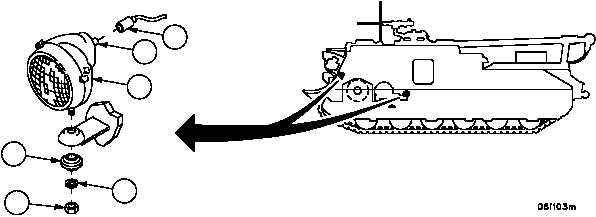
Removal
1. Disconnect wiring harness 4W153 wire 518 (1) from electrical connector (2) on rear of lamp
assembly (3).
2. Remove nut (4), lockwasher (5), finishing washer (6) and lamp assembly (3) from vehicle. Discard lockwasher
and finishing washer.
Figure 93
4
5
6
2
1
3