TM 9--2350--292--20--2
0707 00--2
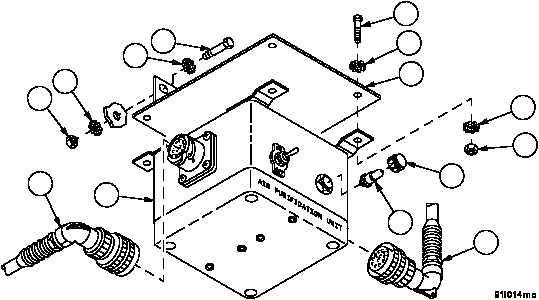
AIR PURIFIER CONTROL UNIT ENCLOSURE ASSEMBLY AND BRACKET
REPAIR -- CONTINUED
0707 00
Disassembly
NOTE
The air purifier control unit enclosure assembly does not
need to be removed to perform the Disassembly/Assem-
bly.
1. Remove lens (11) and lamp (12) from air purifier control unit enclosure assembly (2).
2. Inspect parts for damage and replace as required.
Assembly
Install lamp (12) and lens (11) on air purifier control unit enclosure assembly (2).
Installation
NOTE
Make sure screws are tightened sufficiently to cause ex-
ternal tooth lockwasher to cut through paint to make elec-
trical contact. Removal of paint and primer at interface
mounting surface is acceptable to achieve proper compo-
nent ground.
Use one external tooth lockwasher next to screw head
and one external tooth lockwasher next to nut.
1. Install bracket (7) with two screws (10), four new lockwashers (9) and two nuts (8).
2. Install air purifier control unit enclosure assembly (2) on bracket (7) with four screws (6), eight new lockwashers
(5) and four nuts (4).
3. Connect wiring harness 4W305 P2 connector wire 422 (3) to J1 on air purifier control unit enclosure assembly (2).
4. Connect wiring harness 4W307 connector P1 (1) to J2 on air purifier control unit enclosure assembly (2).
Figure 376
1
2
3
4
5
6
7
12
11
8
9
10
5
9
NOTE
FOLLOW--ON MAINTENANCE:
Connect battery power (WP 0256 00)
END OF TASK