TM 5-4240-501-148P
CARBURETION
Air Cleaners
CARTRIDGE AIR CLEANER - REVERSE AIR FLOW
1.
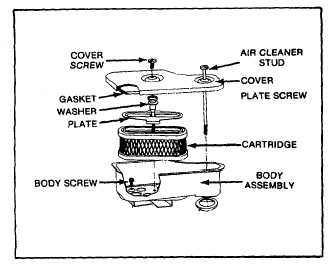
Remove air cleaner stud, screw and gasket.
Replace gasket if damaged.
2.
Remove plate screw, washer and plate.
3.
Remove cartridge and clean air cleaner body
carefully to prevent dirt from entering carburetor
Brush dirt from body through holes into duct.
4.
Clean cartridge by tapping gently on flat surface.
a.
If very dirty, replace cartridge or wash in a low or
non-sudsing detergent and warm water solution.
b.
Rinse thoroughly from OUTSIDE IN until water is
clear.
c.
Cartridge must be allowed to stand and air dry
thoroughly before using.
5. Re-assemble air cleaner. Fig. 6.
Fig. 6 - Cartridge Air Cleaner
CAUTION: Petroleum solvents, such as kerosene, are
not to be used to clean cartridge. They may cause
deterioration
of
the
cartridge.
DO
NOT
OIL
CARTRIDGE. DO NOT USE PRESSURIZED AIR TO
CLEAN OR DRY CARTRIDGE.
SERVICE OIL BATH AIR CLEANER
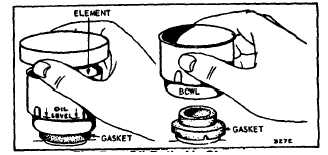
Pour out old oil from bowl. Wash element thoroughly in
solvent and drain dry. Clean bowl and refill with same
type of oil used in crankcase. See Fig. 7.
Fig. 7 - Oil Bath Air cleaner
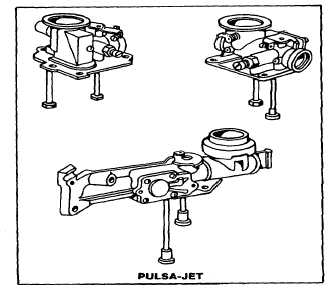
THREE BASIC CARBURETOR STYLES
There are three styles of carburetors used on Briggs &
Stratton engines. Page 3 and i, Fig. 8. Compare the
carburetor to be repaired with the illustrations to
determine style of carburetor and refer to that section for
repair information.
Before removing any carburetor for repair, look for signs
of air leakage, or mounting gaskets that are loose, have
deteriorated, or are otherwise damaged.
Note position of governor springs, governor link, remote
control or other attachments to facilitate re-assembly.
Do not bend the links or stretch the spring. (Section 4
illustrates popular engine models.)
Fig. 8 - Style of Carburetors
3


