TM 9-2350-256-20
a. REMOVAL
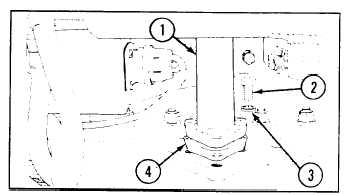
1 Remove lower oil fill tube (1) by removing three
screws (2), three packings (3), and gasket (4).
2 Remove two clamps (5) and rubber hose (6) from
lower oil fill tube (1).
3 Remove two self-locking nuts (7) and two screws
(8) from clamps (9), and remove upper oil fill tube
assembly (10).
4 Remove ID plate (11) by removing two drivescrews
(12) and two flat washers (13).
5 Remove bracket (14) by removing two screws (15), two washers (16), and two self-locking nuts (17).
6 Remove bracket (18) by removing two screws (19) and two lockwashers (20).
b. INSTALLATION
1 Install bracket (18) with two screws (19) and two new lockwashers (20).
2 install bracket (14) with two screws (15), two flat washers (16), and two new self-locking nuts (17).
3 Install ID plate (11) with two flat washers (13) and two new drivescrews (12).
4 Install upper oil fill tube assembly (10) with two clamps (9), two new self-locking nuts (7), and two screws (9).
5 Connect rubber hose (6) between lower oil fill tube (1) and upper oil fill tube assembly (10). Secure with two
clamps (5).
6 Install lower oil fill tube (1) and new gasket (4) with three screws (2) and three new packings (3)
7 Replace engine oil (refer to TM 9-2350-256-10).
NOTE
Follow-on maintenance:
Install powerplant (see paragraph 3-1)
Change 1
3-25