CHAPTER 9: MAINTENANCE OF HULL- AND CAB-RELATED COMPONENTS
TM 9-2350-256-20
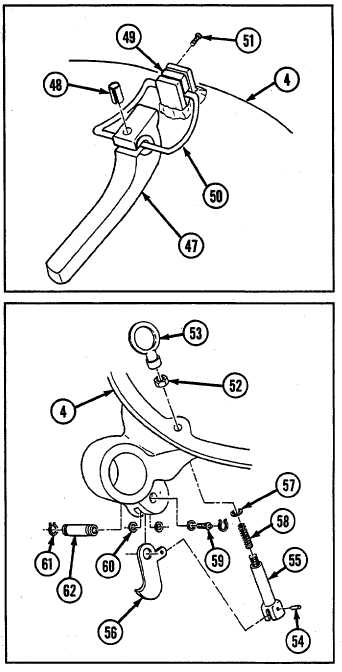
9-27 REPLACE/REPAIR COMMANDER'S CUPOLA ASSEMBLY--Continued
13 Remove inside latch (47) from cupola door (4) by
removing spring pin (48).
14 Remove
plug
(49)
and
latch
spring
(50)
by
removing two screws (51).
15 Loosen jamnut (52) and remove rod end connector
(53).
16 Remove jamnut (52).
17 Drive out pin (54). Separate trigger rod (55) from
latch (56) and remove trigger rod, washer (57), and
spring (58).
18 Remove lubrication fitting (59), three flat washers
(60), and two retaining rings (61).
19 Drive out pin (62) and remove latch (56) from
cupola door (4).
c. ASSEMBLY
1
Insert trigger rod (55) through spring (58), washer
(57), and cupola door (4).
2
Install latch (56) to cupola door (4) with pin (62).
3
Install lubrication fitting (59), three flat washers
(60), and two retaining rings (61).
4
Attach trigger rod (55) to latch (56) with pin (54).
5
Install jamnut (52).
6
Install rod end connector (53) and tighten jamnut
(52).
7
Install plug (49) and latch spring (50) with two
screws (51).
8
Install inside latch (47) to cupola door (4) with
spring pin (48).
9-40