TM 9--2350--292--20--1
0219 00--3
FUEL/WATER SEPARATOR AUTOMATIC DRAIN SYSTEM AND WIRING
HARNESS E2CA128--006 REPLACEMENT -- CONTINUED
0219 00
Removal--Continued
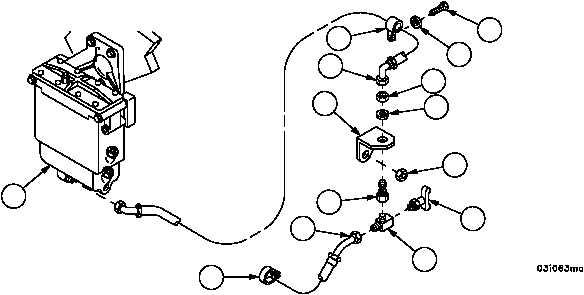
11. Remove clamp (27) and remove drain hose (19) from tee (28).
12. Remove drain cock (29) from tee (28).
13. Remove tee (28) from adapter (30).
14. Disconnect hose (31) from fuel/water separator (5) and adapter (30).
15. Remove screw (32), lockwasher (33), clamp (34) and hose (31). Discard lockwasher.
16. Remove nut (35), lockwasher (36) and adapter (30) from bracket (37). Discard lockwasher.
17. Remove two self--locking nuts (38) and bracket (37) from engine. Discard self--locking nuts.
18. Inspect parts for damage and replace as required.
Installation
1. Install bracket (37) with two new self--locking nuts (38) on engine.
2. Apply pressure sensitive tape to all threaded pipe and hose fittings.
3. Install adapter (30) on bracket (37) with new lockwasher (36) and nut (35).
4. Connect hose (31) to fuel/water separator (5) and adapter (30).
5. Secure hose (31) with clamp (34), new lockwasher (33) and screw (32).
6. Install tee (28) on adapter (30).
7. Install drain cock (29) on tee (28).
8. Connect drain hose (19) on tee (28). Secure drain hose (19) with clamp (27) on second oil pan mounting bolt on
front left bank.
Figure 29
5
19
27
30
28
29
38
37
36
35
33
32
34
31