TM 9-2350-238-10
LAMP REPLACEMENT–CONTINUED
DOME LIGHT
1
2
3
4
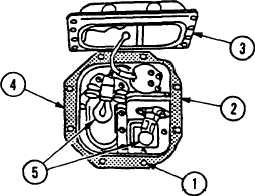
Loosen eight captive screws (1) and
separate dome light door assembly (2)
from light body (3).
Check for cracked, damaged, or torn
door assembly (2) and rubber seal (4). If
condition exists, notify unit maintenance
personnel.
To remove lamps (5), depress and turn
counterclockwise. Install new lamp (5)
(item 26, appx D), depress and turn
clockwise to secure.
Reinstall door assembly (2) and tighten
eight captive screws (1).
LOW ENGINE COOLANT WARNING LIGHT
1
2
3
4
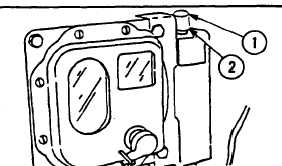
Unscrew indicator light lens (1).
Check for cracked or damaged indicator
light lens (1). If condition exists, notify
unit maintenance personnel,
Depress and turn LED (2) counterclock-
wise to remove. Install new LED (2)
(item 29, appx D) by depressing and tur-
ning clockwise to secure.
Screw indicator light lens (1 ) on secure-
ly. Press to make sure lamp is good.
PANEL LIGHT
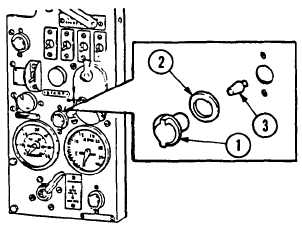
1 Unscrew panel light lens (1). Remove
lens (1) and gasket (2).
2 Check for cracked, damaged, or torn lens
(1) and gasket (2). If condition exists,
notify unit maintenance personnel.
3-38


