SECTION I: CHARGING/STARTING SYSTEM AND VEHICLE BATTERIES
TM 9-2350-256-20
WARNING
Be certain MASTER switch is OFF when working on electrical system to avoid electrical shock and burns.
a.
REMOVAL
1
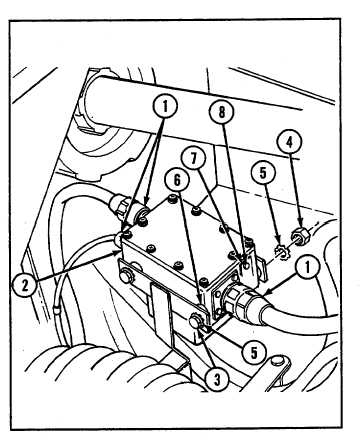
Disconnect three connectors (1).
2
Remove master relay (2) by removing two bolts (3),
two nuts (4), four lockwashers (5), and two sleeve
spacers (6).
3
Remove identification (ID) plate (7) by removing
two drivescrews (8).
b.
INSTALLATION
1
Install ID plate (7) using two new drivescrews (8).
2
Install master relay (2) using two bolts (3), four
new lockwashers (5), two sleeve spacers (6), and
two nuts (4).
3
Connect three connectors (1) to master relay (2).
NOTE
Follow-on maintenance:
•Install grille (see
paragraph 9-15)
•Connect battery
ground cables (see
paragraph 6-4)
6— 3 REPLACE ENGINE STARTER, SOLENOID RELAY, AND BRACKET
THIS TASK COVERS
a. Removal
b. Installation
INITIAL SET-UP
Tools:
Parts-Continued:
Tool kit, general mechanic's (Appendix C, item 53)
•Lockwire (Appendix G, item 155)
•Nuts, self-locking (2) (Appendix G, item 166)
Parts:
•Nuts, self-locking (3) (Appendix GC, item 164)
•Gasket (Appendix G, item 32)
•Nuts, self-locking (2) (Appendix G, item 168)
•Lockwashers (4) (Appendix G, item 106)
•Lockwashers (4) (Appendix G, item 117)
Equipment Condition:
Powerplant removed (see paragraph 3-1)
6—
9


