CHAPTER 6: MAINTENANCE OF ELECTRICAL SYSTEMS AND CIRCUITS
TM 9-2350-256-20
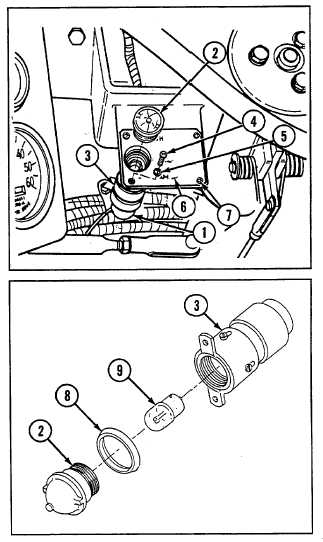
6-33 REPLACE/REPAIR HIGH BEAM INDICATOR LIGHT ASSEMBLY
THIS TASK COVERS
a. Removal
b. Disassembly
c. Assembly
d. Installation
INITIAL SET-UP
Tools:
Parts:
Tool kit, general mechanic's (Appendix C, item 53)
Drivescrews (2) (Appendix G, item 13)
Lockwashers (2) (Appendix G, item 109)
Packing, preformed (Appendix G, item 186)
WARNING
Be certain MASTER switch is OFF when working on electrical system to avoid electrical shock and burns.
a. REMOVAL
1
Disconnect connector (1).
2
Remove light lens (2) from indicator light (3) by
turning counterclockwise.
3
Remove indicator light (3) by removing two
screws (4) and two lockwashers (5).
4
Remove ID plate (6) by removing two drive
screws (7).
b. DISASSEMBLY
1
Remove preformed packing (8) from light lens (2).
2
Remove lamp (9) from indicator light (3) by
depressing and turning counterclockwise.
c. ASSEMBLY
1 Install lamp (9) to indicator light (3) by depressing
and turning clockwise.
2
Install new preformed packing (8) to light lens (2).
d. INSTALLATION
1 Install ID plate (6) using two new drive screws (7).
2
Install indicator light (3) using two screws (4) and
two new lockwashers (5).
3 Install light lens (2) to indicator light (3).
4
Connect connector (1).
6-70