SECTION IV: UGHTING SYSTEM
TM 9-2350-256-20
d. INSTALLATION
1 Install lamp (8) in light door (7).
2 Install three retaining springs (13) in lamp body (7).
3 Install grommet (11) and connector (12)
4 Connect connector (9) and electrical cable (10).
5 Install light door (7) with lamp (8) and tighten three captive screws (6).
6 Install front signal light (2) using nut (3), new lockwasher (4), and finishing washer (5).
7 Connect connector (1).
6-29 REPLACE SPARE HEADLIGHT MOUNT BASE ASSEMBLY
THIS TASK COVERS
a. Removal
b. Installation
INITIAL SET-UP
Tools:
Parts:
Tool kit, general mechanic's (Appendix C, item 53)
Lockwashers (4) (Appendix G, item 113)
Lockwashers (6) (Appendix G, item 116)
WARNING
Be certain MASTER switch is OFF when working on electrical system to avoid electrical shock and bums.
NOTE
Removal and installation procedures are
the same for both spare headlight mount
base assemblies.
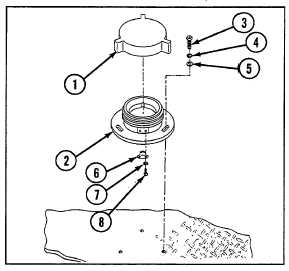
a. REMOVAL
1 Remove protective cap (1).
2 Remove base (2) by removing three screws (3),
three lockwashers (4), and three flat washers (5).
3 Remove clip (6) by removing two screws (7) and
two lockwashers (8).
b. INSTALLATION
1 Install clip (6) using two new lockwashers (8) and
two screws (7).
2 Install base (2) using three flat washers (5), three new lockwashers (4), and three screws (3).
3 Install protective cap (1).
6-65


