CRANKSHAFTS & CAM GEARS
Checking
CHECKING CAM GEAR
All Engines
Inspect gear teeth for wear and nicks. Cam shaft and
cam gear journals and lobe rejection sizes are shown in
Table No. 2.
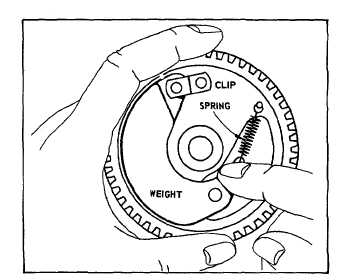
Check automatic spark advance on models equipped
with "Magna-Matic." Fig. 9. Place cam gear in normal
operating position with the movable weight down. Press
the weight down. Release. The spring should lift the
weight. If not, the spring is stretched or the weight is
binding. Repair or replace.
Fig. 9. Checking Automatic Spark Advance
TABLE NO. 2
CAM GEAR REJECT SIZES
MODEL SERIES
CAM GEAR OR SHAFT JOURNAL
CAM LOBE
ALUMINUM CYLINDER
Inches
Millimeter
Inches
Millimeter
6B, 60000
.498
12.65
.883
22.43
8B, 80000*
.498
12.65
.883
22.43
82000, 92000, 94000
.498
12.65
.883
22.43
110900, 111200, 111900
.436 Mag.
.498 PTO
11.07 Mag.
12.65 PTO
.870
22.10
100000, 130000
.498
12.65
.950
24.13
140000, 170000, 190000
.498
12.65
.977
24.82
220000, 250000
.498
12.65
1.184
30.07
CAST IRON CYLINDER
Inches
Millimeter
Inches
Millimeter
5, 6, 8, N
.372
9.45
.875
22.23
9
.372
9.45
1.124
28.55
14, 19, 190000
.497
12.62
1.115
28.32
200000
.497
12.62
1.115
28.32
23, 230000
.497
12.62
1.184
30.07
240000
.497
12.62
1.184
30.07
300000
#
#
1.184
30.07
320000
#
#
1.215
30.86
*Auxiliary Drive Models P.T.O. -- .751 in. (19.08 mm)
#Magneto Side -- .8105 in. (20.59 mm)
P.T.O. -- .6145 in. (15.61 mm)
4


