TM 5-4240-501-14P
CYLINDERS
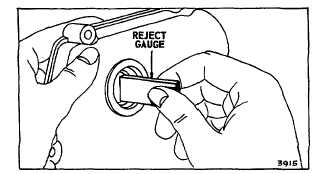
Plain Bearing
Fig. 6 - Checking Bearing
REPLACING PLAIN BEARINGS
Models 9, 14, 19, 20 and 23 Series The crankcase cover
or bearing support should be replaced if the bearing is
worn or scored. Select the correct assembly part
number by referring to the Parts List covering the engine.
Refer to Table No. 3 for main bearing gauges.
TABLE NO. 2
CYLINDER BEARING REJECT SIZE CHART
BASIC ENGINE MODEL
PTO
BEARING
OR SERIES
BEARING
MAGNETO
MAX
MIN.
ALUMINUM CYLINDER
Milli-
Milli-
‘
Inches
Meter
Inches
Meter
6B, 8B*
878
22.30
878
22.30
60000, 80000*
878
22.30
878
22.30
82000, 92000*, 94000*
878
22.30
878
22.30
110900*, 111900*
878
22.30
878
22.30
100000.130000
1.003
25.48
878
22.30
140000, 170000
1.185
30.10
1.004#
5.50#
190000
1.185
30.10
1.004#
25.50#
220000 Horiz
Ball
Ball
Ball
Ball
220000 Vert, 250000
1.383
35.13
1.383
35.13
ALUMINUM CYLINDER
Milli-
Milli-
‘
Inches
Meter
Inches
Meter
5, 6, 8, N
878,
22.30
878
22.30
9
988
25,09
988
25.09
14
1.185
30.10
1.185
30.10
19, 190000, 200000
1.185
30.10
1.185
30.10
23, 230000+
1.382
35.10
1.382
35.10
240000, 300000
Ball
Ball
Ball
Ball
320000
Ball
Ball
Ball
Ball
+Gear Reduction PTO—185" (30.10 mm)
*Auxiliary drive models PTO Bearing Reject size 1.003"
(25.48 mm)
#Synchro-Balanced Magneto Bearing Reject size 1.185"
(30.10 mm)
REPLACING MAGNETO BEARING
Aluminum Cylinder Engines
Except 171700, 191700
There is no removable bearing in these models; the
cylinder must be reamed out so a replacement bushing
can be installed. Place pilot guide bushing in the sump
bearing, with flange of pilot guide bushing toward inside
of sump.
Assemble sump on cylinder. Be careful that pilot guide
bushing does not fall out of place. Place reamer guide
bushing into the oil seal recess in the cylinder. The
reamer guide bushing, along with the pilot guide bushing,
will center the counterbore reamer with the opposite
bearing even though old bearing might be badly worn.
Place counterbore reamer on pilot and insert into cylinder
until the tip of the pilot enters the pilot guide bushing in
the sump. Fig. 7.
Fig. 7 - Counterbore Reaming
Turn reamer clockwise with a steady even pressure until
it is completely through the bearing. Lubricate reamer
with kerosene or Stoddard Solvent.
NOTE: Counterbore reaming may be undertaken without
any lubricant. However, as aluminum material builds up
on reamer flutes, eventual damage to the reamer and
oversize counterbores will be experienced.
Remove sump and pull reamer out without backing it
through the bearing. Clean out reaming chips. Remove
reamer guide bushing from oil seal recess.
Hold new bushing, with notch toward cylinder and in line
with notch on inside of cylinder, (Fig. 8, insert), against
reamed out bearing. Note position of split in bushing.
At a point opposite to the split in the bushing, using a
chisel or screwdriver and hammer, make a notch in the
reamed out cylinder bearing at a 450 angle. Fig. 8.